How to Delete Temp Files and Windows.old Safely
By Robert MocaUpdated 7 min read
The short answer
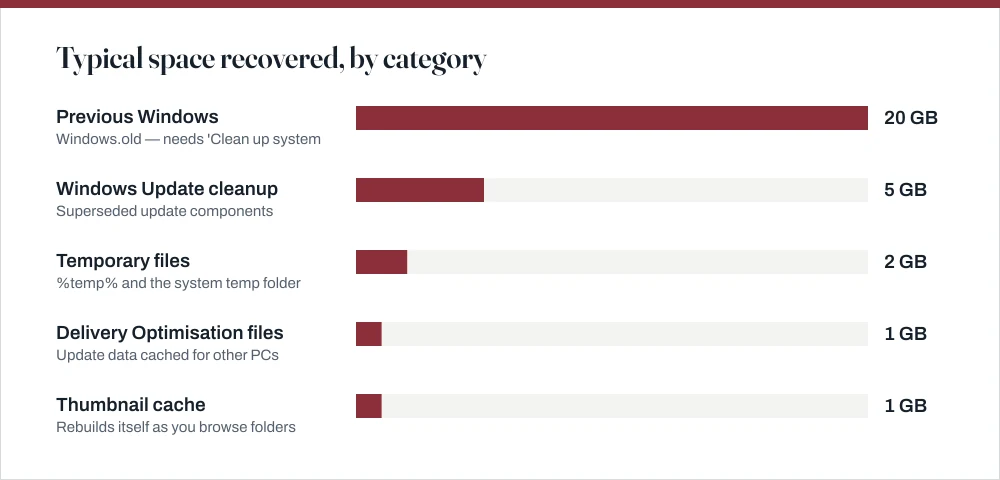
Press Win + R, type %temp%, select everything and delete — files in use are skipped, which is fine. For the real space, run Disk Cleanup → Clean up system files and tick *Previous Windows installation(s)*, often 20 GB.

Four things worth knowing
- Windows deletes Windows.old automatically after 10 days; removing it early only forfeits the ability to roll back an upgrade.
- Disk Cleanup's ordinary mode misses the largest items — you must click Clean up system files to see them.
- Deleting the Windows.old folder by dragging it to the Recycle Bin does not work; permissions block it.
- Registry cleaners and aggressive service disabling do not free meaningful space and occasionally cause harm.
Windows quietly builds up a lot of files it no longer needs, and the biggest of them are invisible to the tool everyone reaches for. Run Disk Cleanup normally and it offers you a few hundred megabytes. Click one extra button, which is the whole trick, and the very same tool offers to give back twenty or thirty gigabytes. That button is the reason this page exists.
The %temp% folder
Clear your user temporary files
Press Win + R, type
%temp%and press Enter.This opens
C:\Users\you\AppData\Local\Temp. The percent signs matter — they expand the environment variable.Press Ctrl + A, then Delete.
Selection shortcuts are covered in the guide on selecting multiple files.
When Windows says a file is in use, tick Do this for all current items and click Skip.
Files held by running programs cannot be deleted and should not be. Skipping them is correct, not a failure.
Optionally repeat for the system temp folder: Win + R,
C:\Windows\Temp, Enter.This one needs administrator confirmation.
Disk Cleanup, including the part people miss
Run Disk Cleanup properly
Press Win + R, type
cleanmgrand press Enter. Choose your C: drive.It takes a moment to calculate. On a large drive this can be a minute or two.
Click Clean up system files.
This is the important step. The dialog reopens with administrator rights and a much longer list including the multi-gigabyte items.
Tick Previous Windows installation(s), Windows Update Cleanup, Delivery Optimization Files and Temporary files.
Leave Downloads unticked. It deletes your actual Downloads folder, and it is included in the list in a way that has caught a lot of people out.
Click OK, then Delete Files, and leave it alone.
Windows Update Cleanup in particular can take twenty minutes or more, and it may continue in the background after the window closes.
| Category | Safe to delete? | What you lose |
|---|---|---|
| Previous Windows installation(s) | Yes | The ability to roll back the upgrade |
| Windows Update Cleanup | Yes | Ability to uninstall older updates |
| Temporary files | Yes | Nothing |
| Delivery Optimization Files | Yes | Cached update data, re-downloaded if needed |
| Thumbnails | Yes | Previews regenerate as you browse |
| Recycle Bin | Careful | Everything you deleted and had not confirmed |
| Downloads | No | Your entire Downloads folder |
| Windows ESD installation files | Careful | The local Reset this PC image |
Windows.old and the 10-day deadline
After a feature update, Windows keeps your entire previous installation in C:\Windows.old. It is there for exactly one reason: so you can go back if the new version turns out to be a problem. Everything needed for that rollback is in the folder, which is precisely why it is enormous.
Windows deletes it automatically ten days after the upgrade. During those ten days, Settings → Update & Security → Recovery → Go back to the previous version is available. After the folder goes, so does that option.
- Deleting it early is safe, provided you are confident you will not want to roll back. Nothing else depends on it.
- You cannot delete it in File Explorer. Permissions block it, and dragging it to the Recycle Bin fails with an access error. Use Disk Cleanup's *Previous Windows installation(s)* entry.
- Your personal files are not in it in any form you need. They were migrated to the new installation during the upgrade. Windows.old holds the old copies.
- If you plan to roll back, do not delete it, and do it within the ten days.
Storage Sense, to stop doing this manually
Windows 10 and 11 both include Storage Sense, which does most of the above automatically on a schedule. It is off by default, which is a genuine shame, because it is the one part of this guide you only ever have to set up once.
Set up Storage Sense
Open Settings → System → Storage.
Turn Storage Sense on, then click through to its settings.
Set it to run During low free disk space, or weekly if you would rather it stayed ahead.
Low free disk space is the sensible default — it does nothing until the space is actually needed.
Set Delete files in my Recycle Bin if they have been there for over to 30 days.
Leave the Downloads folder option set to Never unless you are certain. It deletes files you may still want.
Other places space hides
- Hibernation file.
C:\hiberfil.sysis sized in proportion to your RAM, often 8 to 16 GB. If you never hibernate,powercfg /hibernate offfrom an elevated prompt removes it. This also disables Fast Startup, which is arguably a benefit for troubleshooting. - System Restore allocation. System Properties → System Protection → Configure. Restore points can occupy several percent of the drive. Reducing the maximum rather than turning protection off keeps a safety net.
- The WinSxS component store. Do not delete anything here by hand. Run
dism /Online /Cleanup-Image /StartComponentCleanupfrom an elevated prompt instead, which removes superseded components safely. - Old user profiles. A deleted account can leave its profile folder behind in
C:\Users. The guide on deleting a user account covers removing these properly. - Developer tool caches.
node_modulesdirectories, npm and pip caches, and Docker images routinely run to tens of gigabytes; see uninstalling developer tools cleanly.
If the drive is still full after all this, the problem may not be files at all: a C: partition that is simply too small can sometimes be enlarged instead, which the guide on extending the C drive covers along with the specific reason Extend Volume is usually greyed out.
Common questions
Is it safe to delete the Windows.old folder?
Yes, as long as you do not want to roll back to your previous Windows version. It contains your old installation and exists only to make that rollback possible. Windows deletes it automatically after ten days, and removing it early through Disk Cleanup simply brings that forward. Your personal files are in the current installation, not in Windows.old.
Why can't I delete Windows.old in File Explorer?
Its permissions are set so that even an administrator cannot delete it directly, which prevents accidental removal during the rollback window. Use Disk Cleanup, click Clean up system files, and tick Previous Windows installation(s): that is the supported route and it works.
Is it safe to delete everything in the temp folder?
Yes. Everything there is disposable by design. Files currently in use by a running program cannot be deleted and Windows will offer to skip them — accept that, it is the correct outcome rather than an error. Closing your applications first lets a few more go.
How much space can Disk Cleanup actually free?
In its default mode, usually a few hundred megabytes. After clicking Clean up system files, commonly 20 to 30 GB on a machine that has taken a feature update recently, because Windows.old and superseded update components then become visible. That one button is the difference between a trivial cleanup and a useful one.
Sources
Each source is listed with the specific claim it supports.
Disk Cleanup in Windows — Microsoft Support
Supports: The Disk Cleanup categories, the Clean up system files button, and that it can remove previous Windows installations.
Windows upgrade and migration considerations — Microsoft Learn
Supports: That the previous installation is retained after an upgrade to permit rollback, which is what Windows.old holds.
Deployment troubleshooting and log files — Microsoft Learn
Supports: The role of the Windows.old directory in upgrade rollback and where upgrade artefacts are stored.